Asus V3-M2NC61P User Manual
Browse online or download User Manual for Computers Asus V3-M2NC61P. Asus V3-M2NC61P User Manual
- Page / 104
- Table of contents
- BOOKMARKS
Rated. / 5. Based on customer reviews
- V-Series M2NC61P 1
- First Edition 2
- December 2007 2
- Table of contents 3
- Safety information 7
- About this guide 8
- Wheretondmoreinformation 9
- System package contents 10
- System introduction 11
- 1.1 Welcome! 12
- 1.2 Front panel 12
- 1.3 Rear panel 14
- Voltage selector 16
- M2N-MX SE PLUS 17
- Basic installation 19
- 2.1 Preparation 20
- 2.2 Before you proceed 20
- panel assembly 21
- 2.4.1 Installing the CPU 22
- 2-5ASUS V-Series M2NC61P 23
- Please make sure your CPU 23
- CPU Heatsink 24
- Retention bracket 24
- Retention bracket lock 24
- Retention Module Base 24
- 112 Pins 26
- 128 Pins 26
- QualiedVendorsLists(QVL) 27
- DDR2-1066 27
- DDR2-800 27
- DDR2-667 28
- DDR2-533 29
- 2.5.3 Removing a DDR2 DIMM 30
- 2.5.2 Installing a DDR2 DIMM 30
- 2.6 Expansion slots 31
- 2.6.3 PCI slots 33
- 2.6.4 PCI Express x1 slot 33
- 2.6.5 PCI Express x16 slot 33
- IDE ribbon cable 34
- Power cable 34
- Serial ATA cable 36
- Serial ATA power 36
- 2-21ASUS V-Series M2NC61P 39
- 2.11 Re-connecting cables 40
- 2.12 Reinstalling the cover 41
- Starting up 43
- 3.3 Support CD information 44
- 3.2 Powering up 44
- 3.3.1 Running the support CD 45
- 3.3.2 Drivers menu 46
- 3.3.3 Utilities menu 47
- ADOBE Acrobat Reader V7.0 48
- Microsoft DirectX 9.0c 48
- WinDVD Copy5 Trial 48
- CorelSnaprePlusSE 48
- 3.3.4 Make Disk menu 49
- 3.3.5 Manual menu 50
- 3.4 Software information 51
- Preferences 52
- Hardware monitor panels 53
- WMI browser 54
- DMI browser 54
- PCI browser 55
- ConguringPCProbeII 56
- Motherboard introduction 57
- 4.1 Introduction 58
- 4.2 Motherboard layout 58
- Normal Clear RTC 59
- (Default) 59
- Orient the red markings on 61
- IDE Connector 62
- CPU FAN PWR 64
- CPU FAN IN 64
- CPU FAN PWM 64
- USB 2.0 Connectors 65
- System Panel Connector 68
- BIOS setup 69
- DOS environment 70
- XP environment 70
- 2000 environment 70
- 5.1.2 ASUS EZ Flash utility 71
- 5.1.3 AFUDOS utility 72
- UpdatingtheBIOSle 73
- ASUS V-Series M2NC61P 5-7 75
- 5.1.5 ASUS Update utility 76
- ASUS V-Series M2NC61P 5-9 77
- 5.2 BIOS setup program 79
- 5.2.2 Menu bar 80
- 5.2.1 BIOS menu screen 80
- 5.2.3 Navigation keys 80
- ASUS V-Series M2NC61P 5-13 81
- 5.3 Main menu 82
- 5.3.4 IDEConguration 83
- 5-16 Chapter 5: BIOS setup 84
- 5.3.6 SATA1 and SATA2 85
- 5.3.7 System Information 86
- 5.4 Advanced menu 87
- 5.4.1 CPUConguration 88
- 5.4.2 Chipset 89
- Channel Interleaving [Auto] 90
- Power Down Enable [Enabled] 90
- DRAMTimingConguration 91
- AZALIA AUDIO [Auto] 92
- Front Panel Select [HD Audio] 92
- Onboard LAN [Auto] 92
- Parallel Port Address [378] 93
- Parallel Port Mode [Normal] 93
- 5.4.4 PCI PnP 94
- 5.4.5 USBConguration 95
- 5.5 Power menu 96
- 5.5.4 APMConguration 97
- 5.5.5 Hardware Monitor 98
- 5.6 Boot menu 99
- 5-32 Chapter 5: BIOS setup 100
- 5.6.3 Security 101
- Change User Password 102
- Clear User Password 102
- Password Check [Setup] 102
- 5.7 Exit menu 103
- 5-36 Chapter 5: BIOS setup 104
Summary of Contents
Page 1 - V-Series M2NC61P
V-Series M2NC61PASUS PC (Desktop Barebone)Installation ManualRR
Page 2 - December 2007
xSystem package contentsCheck your V-Series M2NC61P system package for the following items.If any of the items is damaged or missing, contact your ret
Page 3 - Table of contents
5-32 Chapter 5: BIOS setupSet this item to [Enabled] to use the ASUS MyLogo™ feature.Full Screen Logo [Enabled]This allows you to enable or disable th
Page 4
ASUS V-Series M2NC61P 5-33If you forget your BIOS password, you can clear clear it by erasing the CMOS Real Time Clock (RTC) RAM. See section “4.3 Jum
Page 5
5-34 Chapter 5: BIOS setupUser Access Level [Full Access]This item allows you to select the access restriction to the Setup items. Conguration option
Page 6
ASUS V-Series M2NC61P 5-35Exit & Discard ChangesSelect this option only if you do not want to save the changes that you made to the Setup program
Page 7 - Safety information
5-36 Chapter 5: BIOS setup
Page 8 - About this guide
RRChapter 1System introductionThis chapter gives a general description of the ASUS V-Series M2NC61P. The chapter lists the system features including i
Page 9 - Wheretondmoreinformation
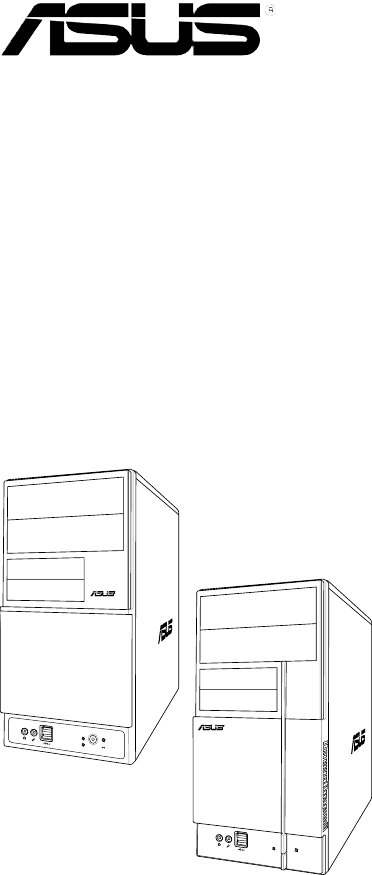
1-2 Chapter 1: System introduction1.1 Welcome!Thank you for choosing the ASUS V-Series M2NC61P!The ASUS V-Series M2NC61P is an all-in-one barebone sy
Page 10 - System package contents
1-3ASUS V-Series M2NC61P1. Two empty 5.25-inch bays. These bays are for IDE optical drives.2. 3.5-inch drive bays. These slots are for 3.5-inch opp
Page 11 - System introduction
1-4 Chapter 1: System introduction1.3 Rear panelThe system rear panel includes the power connector and several I/O ports that allow convenient connec
Page 12 - 1.2 Front panel
1-5ASUS V-Series M2NC61P5. Serial port. This 9-pin COM1 port is for serial devices. 6. Parallel port. This 25-pin port connects a printer, scanner,
Page 13
1-6 Chapter 1: System introductionVoltage selectorThe PSU has a 115 V/230 V voltage selector switch located beside the power connector. Use this switc
Page 14 - 1.3 Rear panel
1-7ASUS V-Series M2NC61P1.4 Internal componentsThe illustration below is the internal view of the system when you remove the top cover and the power
Page 15
1-8 Chapter 1: System introduction
Page 16 - Voltage selector
RRChapter 2Basic installationThis chapter provides step-by-step instructions on how to install components in the system.
Page 17 - M2N-MX SE PLUS
iiCopyright © 2007 ASUSTeK COMPUTER INC. All Rights Reserved.No part of this manual, including the products and software described in it, may be repro
Page 18
2-2 Chapter 2: Basic installation 2.1 PreparationBefore you proceed, make sure that you have all the components you plan to install in the system.Bas
Page 19 - Basic installation
2-3ASUS V-Series M2NC61P2.3 Removing the side cover and front panel assembly1. Remove the cover screws on the rear panel.2. Pull the side cove
Page 20 - 2.2 Before you proceed
2-4 Chapter 2: Basic installation Make sure that the socket lever is lifted up to a 90º angle; otherwise, the CPU will not t in completely.2.4.1 Ins
Page 21 - panel assembly
2-5ASUS V-Series M2NC61P3. Position the CPU above the socket such that the CPU corner with the gold triangle matches the socket corner with a small t
Page 22 - 2.4.1 Installing the CPU
2-6 Chapter 2: Basic installation 2.4.2 Installing the heatsink and fanMake sure that you use only AMD-certied heatsink and fan assembly.Follow thes
Page 23 - Please make sure your CPU
2-7ASUS V-Series M2NC61P2. Attach one end of the retention bracket to the retention module base.134523. Align the other end of the retention bracket
Page 24 - Retention Module Base
2-8 Chapter 2: Basic installation 2.5 Installing a DIMMThe system motherboard comes with four Double Data Rate 2 (DDR2) Dual Inline Memory Module (DI
Page 25
2-9ASUS V-Series M2NC61PQualiedVendorsLists(QVL)DDR2-1066DDR2-800Size Vendor Model CL Brand Side(s) ComponentDIMM supportA* B*512MB Kingston KHX85
Page 26 - 128 Pins
2-10 Chapter 2: Basic installation DDR2-667DIMM SupportSize Vendor Model CL Brand Side(s) ComponentDIMM supportA* B*256MB Kingston KVR667D2N5/256 N/A
Page 27 - DDR2-800
2-11ASUS V-Series M2NC61PSide(s): SS - Single-sided DS - Double-sidedCL: CAS LatencyDIMM support:A - Supports one module inserted into either slot
Page 28 - DDR2-667
iiiTable of contentsNotices ... viSafety informa
Page 29 - DDR2-533
2-12 Chapter 2: Basic installation 2.5.3 Removing a DDR2 DIMMFollow these steps to remove a DIMM.1. Simultaneously press the retaining clips outward
Page 30 - 2.5.2 Installing a DDR2 DIMM
2-13ASUS V-Series M2NC61P2.6 Expansion slotsIn the future, you may need to install expansion cards. The following sub-sections describe the slots and
Page 31 - 2.6 Expansion slots
2-14 Chapter 2: Basic installation * These IRQs are usually available for ISA or PCI devices.When using PCI cards on shared slots, ensure that the dri
Page 32
2-15ASUS V-Series M2NC61P2.6.3 PCI slotsThe PCI slots support cards such as a LAN card, SCSI card, USB card, and other cards that comply with PCI spe
Page 33 - 2.6.5 PCI Express x16 slot
2-16 Chapter 2: Basic installation 4432.7 Installing an optical driveRefer to the instructions in this section if you wish to install a new optical d
Page 34 - Power cable
2-17ASUS V-Series M2NC61P2.8 Installing a hard disk driveTo install a Serial ATA hard disk drive:1. Carefully place the hard disk into the the lowes
Page 35
2-18 Chapter 2: Basic installation 4. Connect a 15-pin Serial ATA power plug from the power supply unit to the 15-pin power connector at the back of
Page 36 - Serial ATA power
2-19ASUS V-Series M2NC61P3. Connect the gray interface of the IDE ribbon cable to the IDE connector on the drive. 4. If you install two IDE hard dis
Page 37
2-20 Chapter 2: Basic installation To install the card reader module:1. Remove the drive slot metal plate cover.2. Carefully insert the card reader
Page 38
2-21ASUS V-Series M2NC61P2.10 InstallingaoppydiskdriveThe V-Series M2NC61P system comes with one 3.25-inch drive bay for a oppy disk drive.To i
Page 39 - 2-21ASUS V-Series M2NC61P
ivTable of contentsChapter 3: Starting up3.1 Installing an operating system ... 3-23.2 Powering up
Page 40 - 2.11 Re-connecting cables
2-22 Chapter 2: Basic installation 2.11 Re-connecting cablesYou may have disconnected some cables when you were installing components. You must re-co
Page 41 - 2.12 Reinstalling the cover
2-23ASUS V-Series M2NC61P2.12 Reinstalling the coverIf you installed an optical and/or oppy disk drive, remove the bay cover(s) on the front panel a
Page 42
2-24 Chapter 2: Basic installation
Page 43 - Starting up
RRChapter 3Starting upThis chapter helps you power up the system and install drivers and utilities from the support CD.
Page 44 - 3.2 Powering up
3-2 Chapter 3: Starting upRR3.1 Installing an operating systemThe barebone system supports Windows® 2000, 32/64-bit XP, and 32/64-bit Vista operating
Page 45 - 3.3.1 Running the support CD
3-3ASUS V-Series M2NC61P3.3.1 Running the support CDTo begin using the support CD, place the CD in your optical drive. The CD automatically displays
Page 46 - 3.3.2 Drivers menu
3-4 Chapter 3: Starting up3.3.2 Drivers menuThe drivers menu shows the available device drivers if the system detects installed devices. Install the
Page 47 - 3.3.3 Utilities menu
3-5ASUS V-Series M2NC61P3.3.3 Utilities menuThe Utilities menu shows the applications and other software that the motherboard supports. ASUS InstAll
Page 48 - CorelSnaprePlusSE
3-6 Chapter 3: Starting upYou can also install the following utilities from the ASUS Superb Software Library CD.ADOBE Acrobat Reader V7.0Installs the
Page 49 - 3.3.4 Make Disk menu
3-7ASUS V-Series M2NC61P3.3.4 Make Disk menuThe Make Disk menu allows you to make a RAID driver disk.NVIDIA 32bit 2000 SATA RAID DriverAllows you to
Page 50 - 3.3.5 Manual menu
vTable of contents5.3 Main menu ... 5-145.3.1 System Time ...
Page 51 - 3.4 Software information
3-8 Chapter 3: Starting up3.3.5 Manual menuThe Manual menu contains a list of supplementary user manuals. Click an item to open the folder of the use
Page 52 - Preferences
3-9ASUS V-Series M2NC61P3.4 Software informationMost of the applications in the support CD have wizards that will conveniently guide you through the
Page 53 - Hardware monitor panels
3-10 Chapter 3: Starting upSensor alertWhen a system sensor detects a problem, the main window right handle turns red, as the illustrations below show
Page 54 - DMI browser
3-11ASUS V-Series M2NC61PHardware monitor panelsThe hardware monitor panels display the current value of a system sensor such as fan rotation, CPU tem
Page 55 - PCI browser
3-12 Chapter 3: Starting upMonitoring sensor alertThe monitor panel turns red when a component value exceeds or is lower than the threshold value. Ref
Page 56 - ConguringPCProbeII
3-13ASUS V-Series M2NC61PPCI browserClick to display the PCI (Peripheral Component Interconnect) browser. This browser provides information on the P
Page 57 - Motherboard introduction
3-14 Chapter 3: Starting upMemory usageThe Memory tab shows both used and available physical memory. The pie chart at the bottom of the window represe
Page 58 - 4.2 Motherboard layout
Chapter 4Motherboard introductionThis chapter gives information about he motherboard that comes with the system. This chapter includes the motherboard
Page 59 - (Default)
4-2 Chapter 4: Motherboard info4.1 IntroductionThe Vintage V-Series M2NC61P barebone system comes with an ASUS motherboard. This chapter provides tec
Page 60
4-3ASUS V-Series M2NC61P4.3 Jumpers1. Clear RTC RAM (CLRTC)This jumper allows you to clear the Real Time Clock (RTC) RAM in CMOS. You can clear the
Page 61 - Orient the red markings on
viNoticesFederal Communications Commission StatementThis device complies with Part 15 of the FCC Rules. Operation is subject to the following two cond
Page 62 - IDE Connector
4-4 Chapter 4: Motherboard info2. USB device wake-up (3-pin PS2_USBPW1-4, USBPW5-8)Set these jumpers to +5V to wake up the computer from S1 sleep mod
Page 63
4-5ASUS V-Series M2NC61P4.4 Connectors1. Floppy disk drive connector (34-1 pin FLOPPY)This connector is for the provided oppy disk drive (FDD) sign
Page 64 - CPU FAN PWM
4-6 Chapter 4: Motherboard info2. IDE connectors (40-1 pin PRI_IDE)The onboard IDE connectors are for Ultra DMA 100/66/33 signal cables. There are th
Page 65 - USB 2.0 Connectors
4-7ASUS V-Series M2NC61P3. Serial ATA connectors (7-pin SATA1, SATA2)These connectors are for the Serial ATA signal cables for Serial ATA 3.0 Gb/s ha
Page 66
4-8 Chapter 4: Motherboard info4. CPU and Chassis Fan connectors (4-pin CPU_FAN, 3-pin CHA_FAN)The fan connectors support cooling fans of 350mA~740mA
Page 67
4-9ASUS V-Series M2NC61PNever connect a 1394 cable to the USB connectors. Doing so will damage the motherboard!6. USB connectors (10-1 pin USB56, USB
Page 68 - System Panel Connector
4-10 Chapter 4: Motherboard info8. Front panel audio connector (10-1 pin AAFP)This connector is for a chassis-mounted front panel audio I/O module th
Page 69 - BIOS setup
4-11ASUS V-Series M2NC61P10. ATX power connectors (24-pin EATXPWR, 4-pin ATX12V)These connectors are for ATX power supply plugs. The plugs from the p
Page 70 - 2000 environment
4-12 Chapter 4: Motherboard info11. System panel connector (10-1 pin F_PANEL) This connector supports several chassis-mounted functions.• System po
Page 71 - 5.1.2 ASUS EZ Flash utility
RRChapter 5BIOS setupThis chapter tells how to change system settings through the BIOS Setup menus and describes the BIOS parameters.
Page 72 - 5.1.3 AFUDOS utility
viiSafety informationElectrical safety• To prevent electrical shock hazard, disconnect the power cable from the electrical outlet before relocating th
Page 73 - UpdatingtheBIOSle
5-2 Chapter 5: BIOS setup5.1 Managing and updating your BIOSThe following utilities allow you to manage and update the motherboard Basic Input/Output
Page 74
ASUS V-Series M2NC61P 5-32. Copy the original or the latest motherboard BIOS le to the bootable oppy disk.5.1.2 ASUS EZ Flash utilityThe ASUS EZ F
Page 75 - ASUS V-Series M2NC61P 5-7
5-4 Chapter 5: BIOS setup5.1.3 AFUDOS utilityThe AFUDOS utility allows you to update the BIOS le in DOS environment using a bootable oppy disk with
Page 76 - 5.1.5 ASUS Update utility
ASUS V-Series M2NC61P 5-5UpdatingtheBIOSleTo update the BIOS le using the AFUDOS utility:1. Visit the ASUS website (www.asus.com) and download t
Page 77 - ASUS V-Series M2NC61P 5-9
5-6 Chapter 5: BIOS setup5.1.4 ASUS CrashFree BIOS 2 utilityThe ASUS CrashFree BIOS 2 is an auto recovery tool that allows you to restore the BIOS l
Page 78
ASUS V-Series M2NC61P 5-7Recovering the BIOS from the support CDTo recover the BIOS from the support CD:1. Remove any oppy disk from the oppy disk
Page 79 - 5.2 BIOS setup program
5-8 Chapter 5: BIOS setupInstalling ASUS UpdateTo install ASUS Update:1. Place the support CD in the optical drive. The Drivers menu appears. 2. Cli
Page 80 - 5.2.3 Navigation keys
ASUS V-Series M2NC61P 5-93. Select the ASUS FTP site nearest you to avoid network trafc, or click Auto Select. Click Next.Updating the BIOS through
Page 81 - ASUS V-Series M2NC61P 5-13
5-10 Chapter 5: BIOS setupUpdatingtheBIOSthroughaBIOSleTo update the BIOS through a BIOS le:1. Launch the ASUS Update utility from the Window
Page 82 - 5.3 Main menu
ASUS V-Series M2NC61P 5-11• The default BIOS settings for this motherboard apply for most conditions to ensure optimum performance. If the system bec
Page 83 - 5.3.4 IDEConguration
viiiAbout this guideAudienceThis guide provides general information and installation instructions about the ASUS Vintage V-Series M2NC61P barebone sys
Page 84 - 5-16 Chapter 5: BIOS setup
5-12 Chapter 5: BIOS setup5.2.2 Menu barThe menu bar on top of the screen has the following main items:Main For changing the basic system congur
Page 85 - 5.3.6 SATA1 and SATA2
ASUS V-Series M2NC61P 5-135.2.4 Menu itemsThe highlighted item on the menu bar displays the specic items for that menu. For example, selecting Main
Page 86 - 5.3.7 System Information
5-14 Chapter 5: BIOS setup5.3 Main menuWhen you enter the BIOS Setup program, the Main menu screen appears, giving you an overview of the basic syste
Page 87 - 5.4 Advanced menu
ASUS V-Series M2NC61P 5-155.3.4 IDECongurationThe items in this menu allow you to set or change the congurations for the IDE devices installed in
Page 88 - 5.4.1 CPUConguration
5-16 Chapter 5: BIOS setupThe BIOS automatically detects the values opposite the dimmed items (Device, Vendor, Size, LBA Mode, Block Mode, PIO Mode, A
Page 89 - 5.4.2 Chipset
ASUS V-Series M2NC61P 5-175.3.6 SATA1 and SATA2While entering Setup, the BIOS automatically detects the presence of SATA devices. There is a separate
Page 90 - Power Down Enable [Enabled]
5-18 Chapter 5: BIOS setupPIO Mode [Auto]Selects the PIO mode. Conguration options: [Auto] [0] [1] [2] [3] [4]DMA Mode [Auto]Selects the DMA mode. Co
Page 91 - DRAMTimingConguration
ASUS V-Series M2NC61P 5-195.4 Advanced menuThe Advanced menu items allow you to change the settings for the CPU and other system devices.Take caution
Page 92 - Onboard LAN [Auto]
5-20 Chapter 5: BIOS setupThis option should remain disabled for the normal operation.The driver developer may enable it for testing purpose5.4.1 CPU
Page 93 - Parallel Port Mode [Normal]
ASUS V-Series M2NC61P 5-21NorthBridgeConguration5.4.2 ChipsetThe Chipset menu allows you to change the advanced chipset settings. Select an item th
Page 94 - 5.4.4 PCI PnP
ixConventions used in this guideWARNING: Information to prevent injury to yourself when trying to complete a task. CAUTION: Information to prevent dam
Page 95 - 5.4.5 USBConguration
5-22 Chapter 5: BIOS setupChannel Interleaving [Auto]Allows you to enable or disable channel memory interleaving. Conguration options: [Disabled] [A
Page 96 - 5.5 Power menu
ASUS V-Series M2NC61P 5-23DRAMTimingConguration The DRAM Timing conguration menu allows you to change the DRAM Timing settings. Select Screen
Page 97 - 5.5.4 APMConguration
5-24 Chapter 5: BIOS setupAZALIA AUDIO [Auto] Allows you to enable or disable the AZALIA Audio function. Conguration options: [Auto] [Disabled]Front
Page 98 - 5.5.5 Hardware Monitor
ASUS V-Series M2NC61P 5-255.4.3 OnboardDevicesCongurationCongure ITE8712 Super IO ChipsetSerial Port1 Address [3F8/IRQ4]Parallel Port Address
Page 99 - 5.6 Boot menu
5-26 Chapter 5: BIOS setup5.4.4 PCI PnPThe PCI PnP menu items allow you to change the advanced settings for PCI/PnP devices. The menu includes settin
Page 100 - 5-32 Chapter 5: BIOS setup
ASUS V-Series M2NC61P 5-27USB 1.1 Controller [Enabled]Allows you to enable or disable the USB 1.1 Controller. Conguration options: [Enabled] [Disable
Page 101 - 5.6.3 Security
5-28 Chapter 5: BIOS setup5.5 Power menuThe Power menu items allow you to change the settings for the Advanced Power Management (APM). Select an item
Page 102 - Password Check [Setup]
ASUS V-Series M2NC61P 5-295.5.4 APMCongurationAPM CongurationPower Button Mode [On/Off]Restore on AC Power Loss [Power Off]Power On By PCI(-
Page 103 - 5.7 Exit menu
5-30 Chapter 5: BIOS setup5.5.5 Hardware MonitorHardware MonitorCPU Temperature [41ºC/105.5ºF]MB Temperature [31ºC/87.5ºF]CPU Fan Speed (RPM)
Page 104 - 5-36 Chapter 5: BIOS setup
ASUS V-Series M2NC61P 5-315.6 Boot menuThe Boot menu items allow you to change the system boot options. Select an item then press <Enter> to di
Related products and manuals for Computers Asus V3-M2NC61P
Computers Asus CM6830 User Manual
 (88 pages)
(88 pages)
Computers Asus CM1740 User Manual
 (70 pages)
(70 pages)
Computers Asus CG8890 User Manual
 (93 pages)
(93 pages)
Computers Asus ET2012IUTS User Manual
 (44 pages)
(44 pages)
Computers Asus ET2013IUTI User Manual
 (42 pages)
(42 pages)
Computers Asus CP6230 User Manual
 (200 pages)
(200 pages)
Computers Asus ET2001B User Manual
(30 pages)
(30 pages)
Computers Asus T5-P5G41E User Manual
(50 pages)
(50 pages)
Computers Asus M70AD User Manual
(76 pages)
(76 pages)
Computers Asus VivoTab User Manual
(78 pages)
(78 pages)
Computers Asus VivoTab RT 3G User Manual
(76 pages)
(76 pages)
Computers Asus CS5111 User Manual
(26 pages)
(26 pages)
Computers Asus ET1602C User Manual
(38 pages)
(38 pages)
Computers Asus ET2300IUTI User Manual
(56 pages)
(56 pages)
Computers Asus ET2012IUTS User Manual
(44 pages)
(44 pages)
Computers Asus CM1745 User Manual
(70 pages)
(70 pages)
Computers Asus Terminator P-III User Manual
(34 pages)
(34 pages)
Computers Asus CS5111 User Manual
(26 pages)
(26 pages)
Computers Asus CM1630 User Manual
(340 pages)
(340 pages)
Computers Asus V3-P5V900 User Manual
(98 pages)
(98 pages)
© 2020, manymanuals.com. All rights reserved. | 1.057 s |
 Manymanuals.com
 Manymanuals.de
 Manymanuals.fr
 Manymanuals.it
 Manymanuals.pl
 Manymanuals.cz
 Manymanuals.es
 Manymanuals-pt.com
Comments to this Manuals